We Receive Gourd Project Ideas for GILDERS® paste wax from Users Like You!
Send us your pictures and we will cite your work or feature your step-by-step instructions.
Send your pictures and instructions to: [email protected]
GOURD PROJECTS
- Gourd Quilts Using GILDERS® paste wax – NEW! – Five beautiful gourd quilt designs contributed by: Loretta Berry, Beverly Schneider, Joy Jackson, Latana Berneir and Jackie Westerbeck.
- Kay P. Collings, Kingsport, TN – Eagle Gourd – A Step-By-Step [email protected]
- Diana Tollenaar – Spirit People – Gourd Design Article
- About Diana
- Latana – Using GILDERS® paste wax as a Gourd Coloring Agent on Artificially Rendered Gourds
Shop GILDERS® full line.
Gourd Quilts Using GILDERS® paste wax
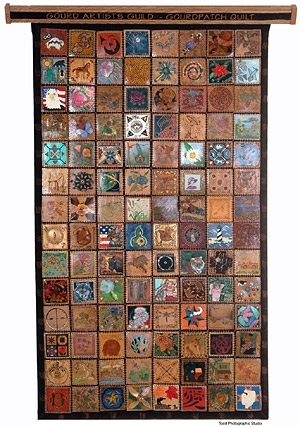
The Gourdpatch Quilt combines the talents of 112 gourd artists from the United States, Canada and Australia to create an extraordinary community art project. Measuring 3′ x 5′ and representing more than 1,000 hours in its creation and construction, the Gourdpatch Quilt has been touring national and state gourd shows to provide public education about the ancient and ageless art of gourd crafting. Painting, pyrography, basketry, beading and carving were just some of the techniques applied to the 4″ x 4″ flat sections of gourds before they were painstakingly stitched together by Lynette Dawson and daughter, Margaret Schroeder from Capac, Michigan to form one unique tableau.
 Gourd Quilt Design by Loretta Berry,Colorado, U.S.
Loretta’s gourd tile is pyroengraved and colored using GILDERS® paste wax . It took Loretta 6 hours to complete her tile.
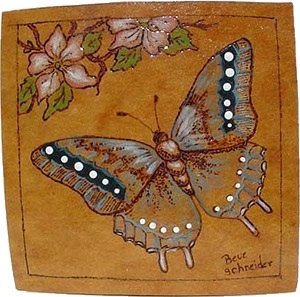 Gourd Quilt Design by Beverly Schneider,Kansas, U.S.
Beverly chose to leave the background of her tile the natural gourd color. She pyroengraved the design and added color with a combination of Prismacolor pencil, acrylic paint, and GILDERS® paste wax . The tile is sealed with Krylon, triple thick, crystal clear glaze. It took her 3 hours to complete her art work.
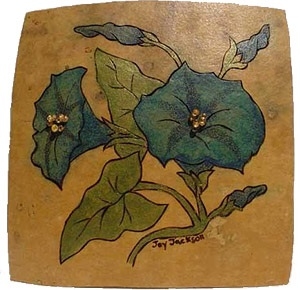 Gourd Quilt Design by Joy Jackson, Ohio, U.S.
Joy chose blue Morning Glories as her art subject, because one of her fondest childhood memories is of herself and father planting the flower seeds. Joy and her father would check on the plant progression daily. Joy’s gourd tile is pyroengraved. GILDERS® paste wax was then applied for color. Her finishing touch is nine seed beads sewn into the center of each open blossom. Joy has 5 hours invested in her gourd tile art.
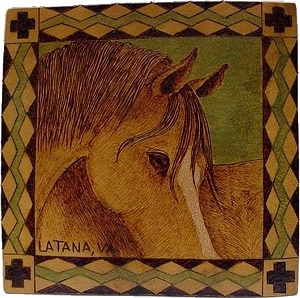 Gourd Quilt Design by Latana Bernier, Virginia. U.S.
Latana’s gourd tile is pyroengraved, with GILDERS® paste wax for color. It took Latana 4 hours to complete her horse series gourd tile.
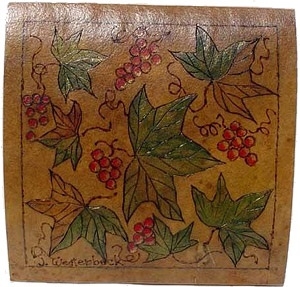 Gourd Quilt Design by Jackie Westerbeck, California, U.S.
Jackie’s gourd tile is pyroengraved, and colored with GILDERS® paste wax . It took Jackie 3 hours to complete her gourd tile.
GILDERS® paste wax is perfect for any art application, including ceramic, wax, foam, wood, and metal applications.
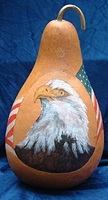 Eagle Gourd – Painted With GILDERS® paste wax by Kay P. Collings, Kingsport, TN
Supplies needed:
Cleaned gourd – Eagle can be painted on whole cleaned gourd OR cut off the top,clean the inside and pine needle coil the top. See photos for examples.
(See below for cleaning and coiling instructions.)
Gilders® paste wax colors needed for eagle:
- Sandalwood
- Canary Yellow
- Black
- White
Gilders® pastre wax colors needed for flag:
- Antique Gold
- Iris Blue
- Tulip Red
- White
NOTE: Acrylic white or thinned GILDERS® paste wax can be used for stars
Brushes: No. 4, 6, 16 (I use Langnickel short bristle brushes)
Better Way Brush Cleaner
Howard Feed and Wax
Krylon Matte Spray
Completion time:
Approximately 1 hour to clean inside and outside (30 minutes for outside only)
Approximately 1 hour to paint; drying time 8 hours; wax and spray 5 minutes.
If coiling the top, allow another 45 minutes.
- Trace outline of eagle pattern on cleaned gourd
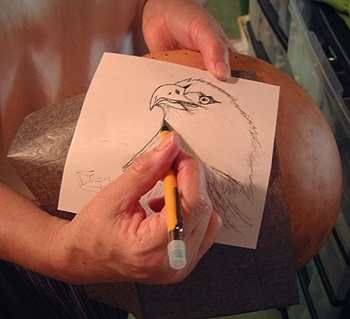
- Woodburn – you need only burn the outline, beak and eye as shown. Shading may be burned or painted, whichever you prefer. I usually burn the shading under beak and around eye.
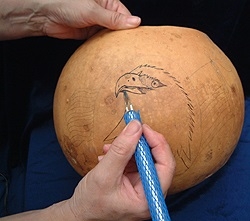
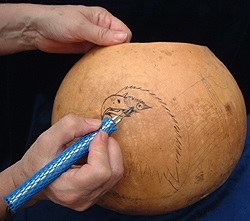
Also wood burn the outline only of the flag. Remember the flag will be a faint painting in the background; the eagle is the most important part and should be more dominating overall.
- Use GILDERS® paste wax to paint the eagle. I use this paste directly from the tin and I use short bristle brushes. If your paste is too thick to spread easily, dip the brush TIP only in brush cleaner, wipe on a paper towel and then in the paste. Too much cleaner will make the paste very thin.
Begin by painting the eagle beak and the area in front of the eye with Canary Yellow and shade with Sandalwood.
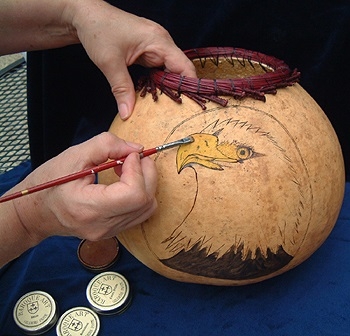
- Next paint the shaded areas on the eagle Black. Then paint the body Black.
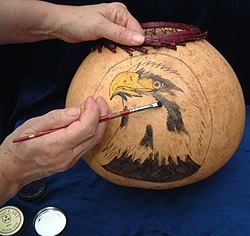
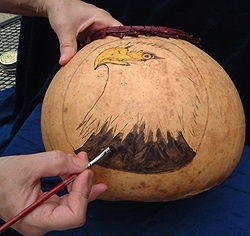
- Clean brush – Using White, complete the eagle head by basing in White – blend the White into the Black. Excessive blending will cause mud so just put it on and blend gently. After the head has been based with White, use the #6 brush and side load. Use the brush on the side and make short choppy strokes for feathers.
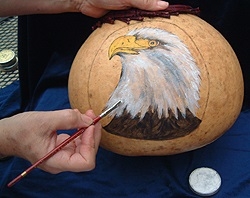
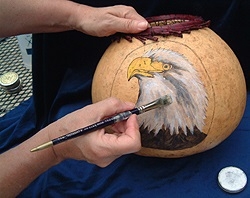
- Next paint the flag – remember that the flag is not painted as bold as the eagle. I usually soften the colors by dipping my brush in paint cleaner, which thins the Gilders Paste as it goes on. Paint the pole Antique Gold; the flag is painted with Iris Blue for the blue area and Tulip Red and White for the stripes. I thin White GILDERS® paste wax or white acrylic paint and dip the tip of a toothpick in the mixture and paint the stars. Keep in mind the flag is not a perfect replica but a shadow behind the eagle.
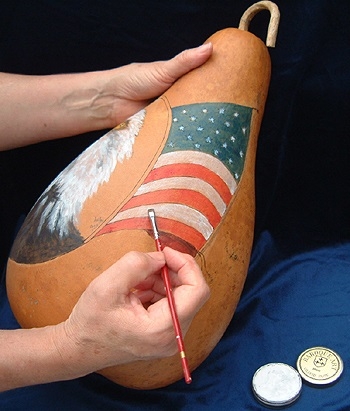
- Let dry completely for 8 hours. Using Howard Feed and Wax on a soft cloth, wipe the entire gourd except the eagle. Spray the eagle with Krylon 1311 matt spray.
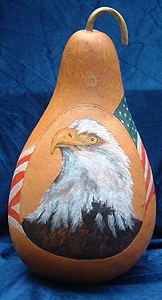
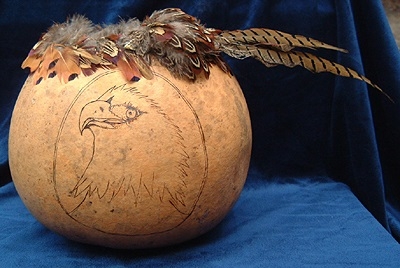
Here are 2 examples of finished gourds and an example of a partly finished gourd with a feather rim.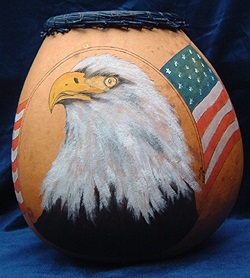
INSTRUCTIONS FOR CLEANING GOURD:
- Soak whole gourd in warm sudsy water for approximately 10 minutes. Use a copper potscrubber to remove the layer of mold and dirt. Set aside to completely dry before painting.
- To remove top – measure from bottom of gourd – draw a circle around the gourd where youwant to cut the top. Use a mini-saw to remove the top. Shake all loose membrane andseeds from the gourd. Use a flat sea shell to scrape and remove the remaining pulp and membrane. (Note: gourd can be filled with warm sudsy water to help remove the stubbornparts inside. However, DO NOT let gourd sit with water inside for more than 2-3 hours.)Once the inside is clean, let the gourd completely dry before painting or wood burning.
- To complete a pine needle rim or feather rim: Drill holes around top of cut and cleaned gourd approximately 1/2 to 3/4 inches apart. Thread sinew on a large needle. Weave in and out ofthe holes using 2 pine needles at a time until completely around and the top of the gourd is covered. Excess ends may be left or trimmed. Feathers are done using the same procedure.
NOTE: Gourds, cleaning tools and marking tools are available from gourd supply houses. An excellent source is www.welburngourds.com – look under ‘tools and supplies’ to findwood burning tools, cleaning tools, saws, and other helpful tools as well as books.
 Spirit People – Gourd Designs
by Diana Tollenaar
My creations have evolved through the years by experimenting with many different products from leather dyes to my newest find GILDERS® paste wax.
The spirit people you see in this article are made up of various sized snake and bottle gourds. The gourd sizes range from 24″ to 42″ in height.
The first step is to clean and cut them. I try to visualize the gourds as a complete image before drawing on them – then followed by wood burning.
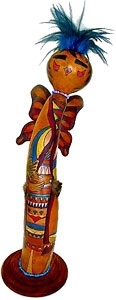 The second step is the coloring process. The gourds are colored with egg dyes and inner-mixing metallic powders with ink dyes to achieve a semi-transparent look.
 The third step is to enhance the color by applying leather dyes. This changes the blues, purples, yellows, and earth tone egg dye colors to make them more vivid or dull them down.
The fourth step is to lightly spray the piece with denatured alcohol which clears away some of the dye to allow the colored layers underneath to come through. Then I refine it by adding more metallic inks. By doing this I achieve different layers, giving it a three dimensional appearance and higher quality of detail.
Recently to my delight I found the Artist Supplies & Products booth at the Welburn Gourd Festival in Fallbrook, California. I spoke with their representatives and they were eager to show me the different applications Gilders Paste can produce. I purchased all 24 colors.
I use GILDERS® paste wax as my final application on certain areas. On my Spirit Maidens I achieved the deep rich color of their hair using Black GILDERS® paste wax . Inner-mixing Violet and Cream and rubbing it can give the flexibility of making it transparent or opaque. I have total control over color combinations that I could not achieve before.
GILDERS® paste wax has also been used for shading. The arms and legs are highlighted with Sandalwood and White. GILDERS® paste wax gives it more dimensions.
These pastes are compatible with all my mediums from water soluble products to acrylic and alcohol base. It is virtually odorless, easy to clean up and dries quickly.
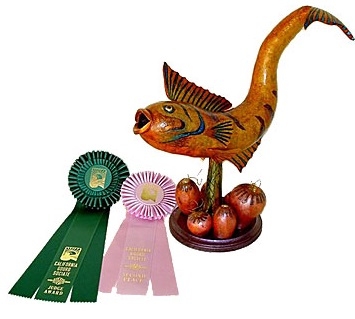 The final step is to apply several layers of exterior clear acrylic spray. Then it is mounted onto a wood base filled with sand for stability and the head is attached. I also use ornaments such as silver pieces, feathers, beads, and turquoise.Each one of my Spirit People are unique and therefore finding GILDERS® paste wax products gives me flexibility, compatibility with my other products and, most important, good color retention and no fading.
Included in this article are other examples of my creations using all the above products.
My web page is www.oterogallery.com/tollenaar.htm
If you would like to contact me please send correspondence to [email protected]
Thank you,
Diana Tollenaar
17 Oriole Lane.
Oceanside, CA
92057760 439-7531
Like the way GILDERS® paste wax looks on gourd art crafts and projects? Check out the use of GILDERS® paste wax on wood applications. Bring your art to life with artist supplies and products from GILDERS®!
 “Using GILDERS® paste wax as a Gourd Coloring Agent on Artfully Rendered Gourds”
by Latana
When I first began creating art using gourds as my “canvas”, I experimented with every type of media out there! In my naivety, I thought I was the first person to use pastels, the first to use water colors! Imagine my surprise when I found out that pretty much everything has been tried…and they all work! My quest for “new” and “different” continues, and although I am certainly not the first to use paste wax, I may be the most vocal about the wonderful qualities coloring a gourd with GILDERS® paste wax brings forth.
The steps using GILDERS® paste wax on all of my designs are first pyroengraved, and I continue on from there:
After all the design has been pyroengraved, a very, very LIGHT sanding with steel wool is helpful. When pyroengraving, a shiny coating is produced which doesn’t take color well. Sanding will remove this film.
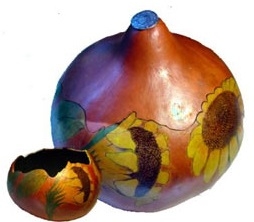 Then, out come the GILDERS® paste wax tins! The colors are so versatile and easy to use there is literally no limitation to them! I use Turpenoid as a thinner for a more transparent look and for blending two or more colors. For instance, Sandalwood, when used straight from the can, is a very rich, dark color.
When a cloth is wrapped over your finger and dipped in turpenoid, then rubbed on the sandalwood in the can, and then you rub that mix onto the gourd, the resultant color is a lighter, more reddish tone and very transparent. So with just one color, you get a wide range of tones and effects. I’ve used Canary Yellow and Coral Red mixed together to make a lovely orange tone for the shadowy part of a sunflower, and it was perfect.
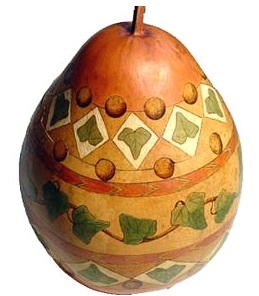
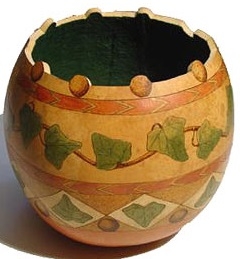
In “Ivy League”, notice the very narrow ‘V’s [within the brown, horizontal bands]. They don’t show up well in the photo, but they are done in Celtic Bronze and applied with a small brush!
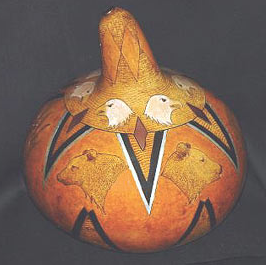
“Powerful Totems” has silver ‘V’s that I applied with a brush as well. I also use my plain fingertip, which gives an entirely different look than a cloth over the finger. Additionally, I have foam tipped applicator sticks for really tiny spots.
The beauty of it is, though…you can safely go outside the lines with no worry! Re-applying a bit of color to an area where another color strayed will result in a return to your original color! Alternatively, Turpenoid on a Q-tip rubbed over the errant color will make it disappear like magic!
I have discovered that by using the cloth-over-finger method if I apply the paste wax and continue to rub the area somewhat lightly, it will take on a much higher gloss than if I allow it to dry first and then buff…sort of like a military ‘spit polish’ effect, I think!The African Bronze is an outstanding color. You will not find any green in any medium that has more life and natural luster than this! I’ve used GILDERS® Verdigris, but then touched it up with African Bronze to retain that wonderful look.
In “Powerful Totems”, I wanted the Eagles’ heads to be transparent. White or any color containing lots of white is difficult on a gourd because of the imperfections in the gourd surface. Small “craters” tend to fill with the color, and in the case of white become quite obvious and distracting. I discovered that by using a very thin mixture of cream and turpenoid and rubbing until the mixture just started to dry, and then barely touching it with a clean dry cloth and rubbing ever so lightly, I got an even, very transparent off white…just the right look for this Native American theme!
When you have finished hand rubbing in all your GILDERS® colors, you can simply leave the gourd as is! However, if you prefer, it will also accept spray acrylic sealers with NO alteration in appearance (except to add gloss if you use the glossy sealer). No bleeding, dulling or anything deleterious occurs.
Thank you Latana!
Other gourds using GILDERS® paste wax by Latana’s. Here are just a few examples:
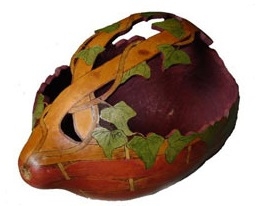
Gourd Baskey by Latana
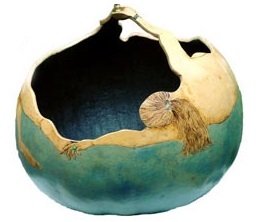
This beautiful gourd piece by Latana is entitled “To Us”
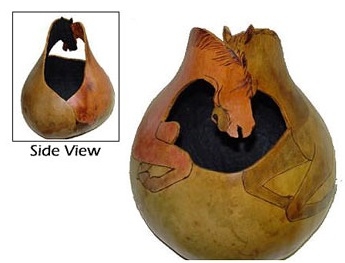
Gourd Basket by Latana
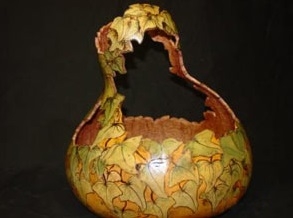
Ivy Basket by Latana
The pictures shown here are just a small sampling of her work so be sure to visit Latana’s online gallery to see her other fabulous creations!

